Monday, December 17, 2012

How to make a Pattern

We all have that favorite shirt or pants that fit perfectly and you wear until it is worn out. What do you do to replace it? You can search until you find it or you can do what I did and make your own pattern. I have a lot of sewing books and they are all helpful but what it boils down to is practice, practice, practice. My sister had a favorite pair of knit pants that frankly should have been trashed long ago. Here is the easiest way to do a pattern.
1) take a good look at the item if it is a shirt be aware you will need  the front, back, sleeve, collar and any other section. Pants you need front, back, waistband, pockets. Always start simple you can move up to complicated when necessary. In this case the pants. I needed one front and one back panel. you can either unpick all the stitching or do it the lazy way. in this case I cut the left front out and the back right by cutting into the fabric on the opposite sides leaving me with this.
2) then lay the fabric on paper. My sister is a teacher and had several large writing pads about 24" by 36". I like this paper because it is lined and easier to mark. However any large paper will work. I have used wrapping paper which I bought on sale after Christmas  a large roll is better then tissue and easy to story.

once you lay the fabric on top mark the paper 1/4 inch all round making sure to mark where pockets and any darts go, then cut. this leaves you with a nice pattern.
If I am going to use a material that has less stretch I would mark 3/4 to 1 inch around the sides depending on the material. You do not need to do this for the mid-seam and crotch area.

3) cut out the material making sure that you mark which is front and back. Chalk works good for that. I wrote it on the inside until I had it all assembled.

The pants only needed to be hemmed. for pants that have an elastic waist I prefer doing a separate waist band this gives it stability.

Pants with elastic are one of the easiest to do and for those of us plus size I found that doing a longer pocket set in the side means that when you sit down the stomach expands nicely with out being too tight and when standing the pocket looks normal. This really only works when the inside of the pocket is made of the same material I also made them a little deeper so if she has anything in the pocket it won't fall out when she sits another problem for the plus ladies.
this if the first of several pants cut from design that she knows fits her well and is lot cheaper then trying to find a pair. 

when you finish the best way to store the pattern pieces is a ziplock bag. I write out the information on paper making sure to notate how many pieces. also on the pattern pieces themselves so that I do not mess them up I will put 1/5, 2/5 etc  and the pattern number is the date 111012

Have fun and don't be afraid to practice. 

Necessity blah blah or whatever works

I had an idea but thought it was crazy then I saw someone else pin about a skirt made out of a sheet with a pretty pattern and decided okay maybe I was not that crazy. Fabric can be expensive especially if you are sewing something that is really only meant to last a few months or can be damaged easily. Such as my sisters bed dresses, (see prior post) or around the house shifts for me and my sister. So I looked at the sheets and found Walmart had a sale on Twin flat sheets for 4.00. I decided that white was too boring and decided to twist the fabric then soak in a large pan of dye. I took it out of the dye still twisted then loosened it up dip it back in then tossed in the washer, the picture is not the best but you can see streaking the dye did nice marbling effect.


 Then I laid out the pattern which fit very well is little left over. Since the dress is not too fitted the twin size worked best. 
Now that I know it works I working on one with stripes and plan to get more in different florals. The dress takes about 1/2 a day to make including dying and the material cost was 4.00 for the sheet and 1.50 for a 1/2 bottle of dye. You cannot beat that with a stick. 

Friday, December 14, 2012

Well It's December

I did not think it had been that long since I posted. Sometimes I think this year just shot past us. Halloween was fun and at least the costumes were easy.
The boys decided that they were going to be zombies, tear up an old shirt using pinking shears for that nice ragged look and add some red material to the inside. Add mask instant zombie. Not too sure what the fascination with zombies is evidently it is big with both small and large boys.

I did a nice witch costume for my niece based on this design.
It came out pretty good except I can't find the pictures oh well. I am going to see about re-fashioning the top to something she could use everyday. We had a garage sale and I cannot believe the stuff we are finding. Somethings of course do not get sold due to sentimental value but others are just piling up. For those that have to combine households you know what I mean. There are only so many dishes and gadgets that one house needs. I love garage sales because it is a way to make a little extra money for little effort. Whatever is left I am going to call the Salvation Army and ask for it to be picked up. I am going to rent a small storage unit and need to cut down the pile of stuff. There are several large items we are trying to sell on Craigslist and Etsy. I also have several sewing projects I am going to post separately  We are enjoying the last week before school lets out and all the demons are loose.


Tuesday, September 4, 2012

Moving bites

well there are still a lot of boxes that need to be gone through and we have eaten way, way too much takeout but we are finally done with the move. Thank goodness we were only moving around the corner because the running back and forth in the heat was a pain. Luckily my sister had friends to help move my sister into her chair and we moved her that way. Unfortunately getting her back into the bed was harder because everybody had left already. My sister and niece put her mattress and boxspring on the floor and dragged her into the bed.

On a side note we finally tried the DIY liquid soap recipe that has been floating all over and it worked real well. So did the softner with vinegar and hair conditioner which I thought for sure was going to smell funny.

hopefully back to regular posting now that I have new clipon reading glasses mine are in a box somewhere.

Thursday, August 16, 2012

2-ingredient cake

Well school starts soon and everyone needs that quick desert with no complications and we have one for you. I love pumpkin pie, pumpkin bread, pumpkin cookies, you get the idea. My sister saw a recipe for using cake mix,  canned pumpkin and spices. She decided that why not use the ready mix pumpkin pie mix that has everything with a white cake mix and you cannot beat two ingredients.
Follow directions for style of cake in this case we have been doing a lot of Bundt cakes for some reason. Serve warm with vanilla ice cream, dust with powdered sugar or you can spoon warmed up vanilla icing over the top.

As you can see we had some icing on hand. It is moist, not too sweet, a little dense and I think it is one of those that the flavor is better the next day. I would like to try this with either a pineapple or orange cake mix.

Wednesday, August 15, 2012

Dressing a plus size patient

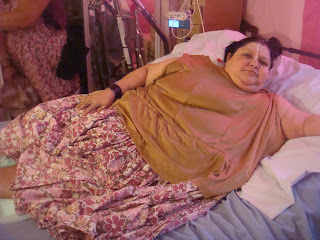
Our sister is physically disabled and at this time cannot get out of bed, as she weighs over 300 lbs. you can imagine how hard it is to get her dressed. For a time we used hospital gowns but they are boring, ugly, and too short and do nothing for morale. This is especially true during special events like birthdays, holidays or anytime the family gathers round.
Around one holiday I decided to make something to wear. The way I saw it why did it have to go around her? She was not getting out of bed so why try to force her into something traditional. Therefore, I grabbed a pattern and modified to make a basic empire waist short sleeve dress. However, I did not close the back up. Instead once her arms were through then the sides were tucked in. there was a tape at the neck line to tie shut if needed and the skirt went down to her feet. She was completely covered and looked completely dressed.

This one is in her favorite lepord print but I did not preshrink the material and it shrunk badly. My bad :(

Then I took some of her older clothes including her favorite t-shirt cut them up the back, attached the skirt and made her several outfits. I think they look good on her and she feels more normal.


Skirt to Blouse

My sister and I have really gotten into the blogs for DIY. I have always had to alter clothes we buy due to our size and my height but never did major overhauls until we caught the re-fashion bug. The blog we saw first was Refashionista (http://refashionista.net/) and her 365 changes. Now we have a few of our own to share.
My sister brought several skirts when they were on sale but was not happy with the fit we decided to try to make some blouses instead.
First I trimmed the elastic then placed the skirt upside down on my sister. She wanted a draped front so I pulled the front in until I got the proper fit. You will noticed I used binder clips instead of pins this is easier for quick fittings and less danger of poking an eye out when you are trying to take it off. I wanted the seams in front to look straight as they would look more natural. The arms are loose and drapey.


The hem of the skirt acts as a natural hem for the neck and sleeve although I did turn the back of the neck under once to make the seam look straight along the shoulder. I serged the bottom and hemmed it ½”. I think it came out real well.


Tuesday, August 7, 2012

Seasoned Fajitas are not just for tacos

Seasoned Fajita meat can be a great budget stretcher and much more versatile then just using in a taco. As it is already seasoned, a lot of work is done for you. Some examples of what you can are as follows
·         Super Nachos a great family pleaser and wonderful for the those busy nights or when you are looking for something not too heavy on a hot day.
o   1 package of seasoned Beef or Chicken Fajita meat cooked at 350 for 40 – 50 minutes then chopped roughly
o   1 large bag of nacho chips
o   2 cans of Nacho Cheese Sauce (looks better then shredded cheese but you can use it if you prefer.)
o   1 large can of refried beans heated and thinned with a little water for a smoother consistency and it looks better on the nachos
o   Assorted condiments such as lettuce, tomatoes, onions, guacamole, and sour cream; in fact without the last two condiments this is a very money saving meal
o   I forgot to take a picture so found this one on the web fairly close to what it looked like.
·         Chalupas are the same thing only using pre-made chalupa shells
·         Fettuccine Alfredo Fajita – past is always a great meal stretcher and the Alfredo sauce balances the spices in the fajita nicely. This recipe fed 8 people
o   1 package of Chicken Fajitas baked and sliced ½ inch thick
o   2 bottles of Alfredo sauce heated then add fajita meat, simmer lightly for 10 minutes
o   1 large package of fettuccine noodles cooked to al dente if it is too soft it will not hold the sauce well (can be served over hot biscuits or white rice)
o   Serve with garlic toast
o  
·         Chicken Fajita Tenders - someone gave us a lot of bags of plain cornflakes and lets face it unless it is covered in sugar kids are not interested in boring cornflakes so now what. well we had some seasoned chicken fajitas and decided what about chicken tenders. No need to season anything so simple and the kids loved them.
o   1 package of Chicken Fajitas sliced thick
o   3 eggs beaten
o   1 package of corn flakes crushed
o   Dip chicken in eggs then corn flakes being careful to press firmly to ensure even coverage. There is no need to season the corn flakes as the chicken has enough spices
o   Lay in baking dish coated with non stick spray
o   Bake at 350 for 50 – 60 minutes until runs clear
o    you can make gravy if you wish but ranch dressing works really well

Thursday, August 2, 2012

Our Mothers Turn

Everyone talks about the circle of life but I think the best example of this is when the child becomes the caretaker. My mother is in the early stages of dementia. She still recognizes us and can function but needs a lot of care. In addition to tips about sewing, cooking, decorating, children, etc... there will be hints on how to deal with an elderly parent. The best decision I ever made was to move my household of our mother, our handicapped sister, my niece and myself in with my sister and her family. She believes and I agree with her that it is good for the children see the realities of taking care of my mom and sister and that family is important. My father was retired Army and always believed that family came first, then friends, then everyone else.

One thing that we have learned with our mother is to keep her hands occupied. Last Christmas I bought one of those block puzzles. It keeps her occupied even though she has managed to lose a couple of the pieces. The colors need to be bright although I took off the original packaging so she would not realize it was a child's game.