Showing posts with label refashion. Show all posts

Wednesday, October 21, 2015

Don't throw it away

I sometimes wonder where we are going because these coming generations are so used to the idea of it's broke throw it away, it's torn throw it away, it's stained throw it away. Reuse people it a simple concept. With so many people everyone has their own clothes basket and since 1/2 of this family seems to have the mental age of a toddler the baskets get thrown around, stepped on, overly filled and other abuse like this one.
Well the little suckers are surprisingly overall sturdy and tall so I decided to trim it just enough to take off the damage. You will need a ruler, a marker or pencil, and sturdy shears or utility knife, and an emory board.
You can either mark all the way around or use the holes for guides. an alternative is to mark several points and use scotch tape to get a straight line. Now the hard part cutting. If you use an utility lay the basket flat on a cutting surface make sure when using the knife that the hand holding the basket is to the side of the cutting line and not on top of the line or behind the hand using the knife. The plastic can be tough and you can slip easily and trust me cutting yourself hurts like hell not to mention could be dangerous if you cut too deep. Personally I prefer the kitchen shears less chance of injury. If you use older scissors make sure you sharpen them.
When you finish you then need to use an emery board to smooth over the cut surfaces to keep from scratching yourself or from it catching on clothes.
I usually use a small amount of whatever is in the basket to cushion the holes when I pick up the basket when it is full.
 In the other basket the handles tore so I just cut them off. The baskets last a little longer and one less expense this month.

Monday, July 6, 2015

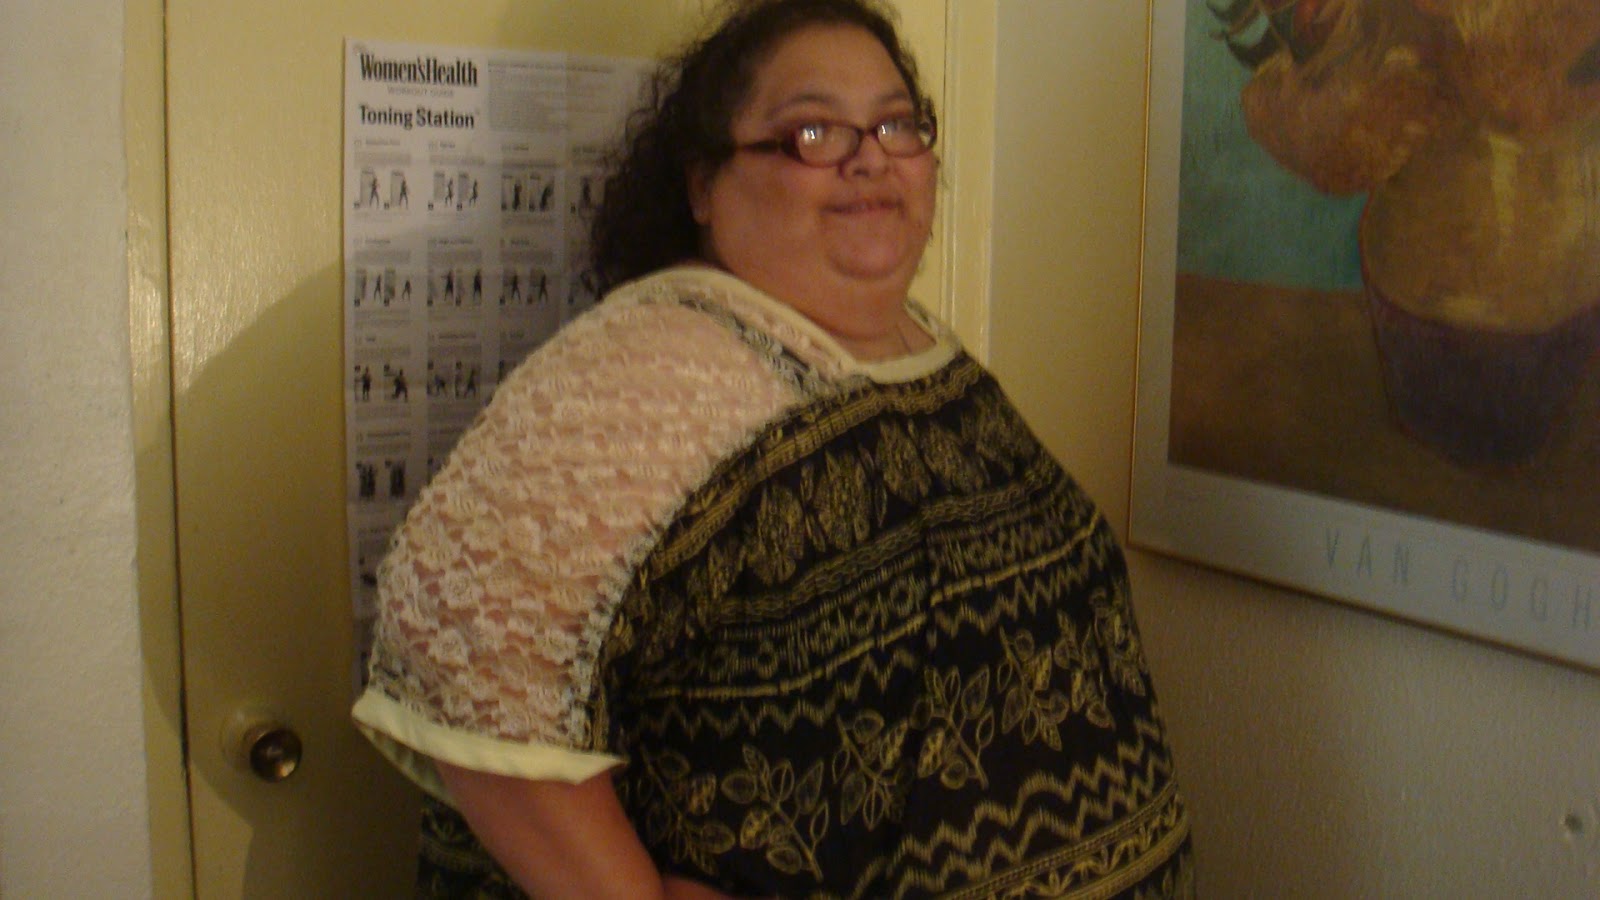
Skirt To Top With Lace Sleeve

I am very found of broomstick skirts or really any skirt that is really gathered because there is so much material to play with and a plus size woman can get away with using a smaller size. In this case the skirt was an XL and my sister wears a 4-5XL. The material was white and navy but there were spots so I put it in some yellow dye, and took off the waistband.


I wanted something with sleeves in a kimono style but the top would be too short if I tried that from the top, so I decided to try something different. I cut the top straight across then measure down six inches come in straight. I already had the bust measurement plus 3 inches so knew were the line would end. I then angled the cut out to the bottom to give an a-line shape. We wanted a loose flowy top but not too loose. 


I forgot to take picture of the next step but all I did was measure 4 inch out from the center then measure from that pin to the edge of the sleeve (18") then cut a rectangle of lace 14" wide by 18" long. I like doing it this way because I can make the sleeve as wide as I need by adjusting the width of the lace without trying to force the fabric to the right size. It it is too narrow take off and redo. You can also taper the width if you want the ends more narrow or wider. I sewed that to the sleeve and finished the edges with a serger because the material unravels.
I finished it off with yellow binding all around the inside and the end of the arms. I did this instead of folding and hemming because there is nothing more annoying then a rough edge irritating you.


It actually looks good with a white or yellow bra or better yet a strapless. This took very little time and makes a nice summer top.

Wednesday, September 17, 2014

How to keep from tripping with loose sandals

I love sandals especially just for around the house because hello sewing and bare feet do not mix. I am always dropping pins and just because his luck ran that way, my dad would always be the one to get one jammed in his foot. However lately due to a bad leg sometimes my foot drags or I have to keep it locked and that means lifting it flat footed and if your sandals are loose very easy to catch it on a rug or step or whatever.


Very nice sandals but as you can tell way too loose. I can either walk with toes clenched around the strap (very uncomfortable) or pray I don't catch it on the rug, lose my balance, fall sideways, luckily landing on a chair and hitting the table, knocking over the glass that I set on the edge of the sewing table because my hands were full and I had not tightened the lid and spilling lemonade on my sewing machine. I am very, very familiar with Murphy's law. Luckily the lid was loose but still on so no damage. So time to fix the problem.


Luckily these seem fairly easy to do first thing was to take care of the plastic comfort slide. I did not want to remove it so I trimmed it instead.


I keep one seam ripper for jobs like this and one for actual seam ripping so I do not dull the blade. You can also use small sharp scissors but I find better control this way. Once I cut all the way around I slice up and remove the piece. To make sure the remaining half does not irritate my foot I use an emery board to smooth the plastic.


I am lucky because in this one you can see the leather loops through instead of sewn directly so I pushed the loop lower and moved the plastic up until I had it in the right place.


I used a thimble to help push the needle through the leather and made sure the stitches were small and pulled tight. Also to prevent possible irritation make sure the knot beginning and ending are in the front.


Here you can see the real difference in height.


Much better fit and more comfortable. If there is no loop then fold the strap and stitch the top and bottom of the fold to make sure there is no gap. In this case you would have to remove the plastic guard. If you slice it carefully you could put it back with a little goop or buy the ones they sell on line. 

Sunday, July 13, 2014

Extending the life of a hoodie

A friend of the family has a favorite hoodie that as you can see was on a downward slope to the trashcan. At first I figured that I could trim one layer and fold the other layer over to make the cuff but the damage was too much. So I decided to get creative.

First I removed the cuff and did a quick press to smooth the edge. I keep a bag near the sewing table of scraps that could be used, nothing too small because I have a hoarding habit when it comes to fabric and found 1/2 a heavyweight jersey tshirt and cut two rectangles.


I cut the fabric 4 inches wide and 1/2 inch longer then the sleeve. Then I folded each piece in half , sewed it shut with a small zigzag and serged the ends. So I ended up with a neat tube that stretched nicely.


I used a small zigzag stitch to attach it to the sleeve. I was not worried about unraveling I just wanted to be sure it would stretch as needed. Normally I would recommend a dye dip to refresh the color but she like the faded look.

Sometime it is the little things that can give a garment a new life. A 1/2 hour and small piece of fabric later you have a new sleeve. This is also a good idea for the one that fits but the cuff is just too tight or fits funny because it is meant for someone smaller. You will usually find that when you undo the seam the fabric will usually stretch a lot more then you expect so making the cuff bigger will not hurt anything. Measure your wrist for a snug fit and cut the rectangle 1/2 inch longer. Then ease the fabric to the cuff after the first wash it will look natural.

Friday, March 7, 2014

Customizing bras

Like most women I hate bra shopping and have actually taken to wearing sport bras because I am lazy and hate having a bra that digs into the shoulder, too tight, too close in the middle, the straps falling and finding one that looks pretty. So I have been thinking about make ones from scratch or maybe a corset but that is for later, what I am doing right now is customizing bras we can can find. the size of the bra is not really that important what is important is that he cup fits well. The bras I am using are 42D while my sister is more of a 50D. Try finding one that size that is not an arm and a leg and that does not look like something from the 50's is difficult if not impossible.

First step is to separate the bras from the front. Everybody is different the best way to determine size is to measure the space while either wearing a good bra or after cutting the bra hold the pieces up to your breasts fitting comfortably and then have some one measure at the top of the cup. You will need to decide at this point if you wan the clasps in front or back. For myself and my sister it is just easier to have it in front instead of playing contortionist. Then cut the clasps from the back just past seam where the clasps are sewed to the bra. You will have to do this whether you put clasps in back or front. Detach the back strap where it meets the bra remember since you are making the back bigger you will have to move the strap in. At this point the bra should like the one below.


I have found a lot of use for the satin bindings that are used for edging blankets in this case I used a nice beige. 


if doing the clasp in the front cut 2 pieces of the satin 3 inch long. Open the satin piece and fold one edge in twice 1/4" (this will prevent any fraying remember that this part will be handled often) then sew them to each edge of the clasps wrapping around. One thing to remember is that one line of  hooks and eyes so pull the remainder you should now have pieces that look like this.

In this case the cups fit best at 3 inches apart at the top. Remember that they must be wider apart at the bottom. If you make this center straight the clasps will unhook the first time you move your shoulders as I found out the first time I did this. I tacked it by hand first then used the zipper foot to sew close to the under-wire.


If you are putting the clasp in the back then cut the satin twice as long as you need then leave it folded in half and sew shut. Again remember the bottom needs to be wider then the top when you finish. A good rule of thumb would be an 1" to 1 1/2" inches difference. In this case I used an 1 inch. remember that the final goal is for the center to be flat to the chest if it is not then shorten or lengthen as needed.

I took a tight chest measurement right under the bust then took off 1 inch the reason for this is that the sides are elastic and I wanted a snug fit. I then cut a piece 13 inches long and sewed it with open fold facing up. The reason for this is so that I could insert the strap into the fold then sewed the fold shut. This prevents the end of the strap rubbing into the skin. It will have to be tried on to mark the straps I did not want a T-strap look but I hate having the shoulder strap fall down when it is too close to the side. If you are putting the clasp in back you would cut the ribbon in half  then attach the cutoff clasps to the end. You are merely extending the sides.

You now have a comfortable bra with little expense. You can use any bra so long as the cups fit which opens a lot of possibility and means you can pick up the more common sizes like 40D when you really wear a 50D.

Wednesday, January 30, 2013

Refashion weird t-shirt sports bra combo thing

Okay this is one of those weirder shirts it was a combo of a tshirt and a sports bra. the body was dusty pink and the straps were white. Into the dye it went.
First thing was to get rid of those straps and back bra part. Then I saw on Pinterest where they added some shape to the front by ruching so I tried that.
Find the center seam then iron makes it much easier. I used a paper tape it is easier to draw on and does not leave residue. I experimented with distance and found that 3/4 inch was the right distance. Why this sounds obvious make sure that the bigger part of the running stitch is in the back. Even the experienced sewer can make this mistake especially if you are listening to a good song and not paying attention :)
I just bought a new toy a Bejeweler Pro and that heart finishes the front nicely. Well it still needed something so I decided to dress up the sleeves.
I tried freehand drawing but really suck so I printed the pattern I wanted and learned something. If the design is too close in some areas you cannot put the stones down. Also while it is not hard it is time consuming and stress full if falling a pattern because you have to stay steady and with my back problems I could only do a little then lay down so it took me even longer. In addition I have read that it is best to really push the stone down with something to force the glue into the material. Just to be on the safe side I put a piece of paper over the top and ran an iron over the whole thing to make sure I got everything.
Shirt came out pretty good and survived washing and drying with no problems.


Riv said it would look even better with a good bra that is going to be one of my projects

Refashion shirt to jacket


We all have that shirt that just does not fit comfortably or is not in style anymore. So we decided instead of throwing it out to try something with it. What did we have to lose.
First thing was to dye it because the white was dingy. I used Maroon because of the florals and it did not turn out bad.
Because it was a little snug we decided for an open look. When you have to cut a T-shirt I found ironing the edge you are going to cut makes for a better cut. since the neck had a weird trim I folded that in.
Again before sewing iron your edge it helps to keep the material straight without any weird stretching and you can see if there are going to be any problems like the corner that needed to lie flat. I used pinking shears so did not have to worry about the edges.
To dress it up a little I used black rhinestones in the hearts of the flowers to give it a sparkle and added trim to the neckline.
Now its a new top that she can use more often with three different tanks underneath.